Drawing with PIL(Pillow)#
Note
If you have never drawn with PIL or require a refresher the following paragraphs should help.
PIL has several modules, the two we will mainly require are Image and ImageDraw. Image deals with the file whereas ImageDraw gives us the ability to create lines, arcs, rectangles and polygons - a bit like tkinter canvas. We draw directly on the image without needing a canvas.
After importing the necessary modules, create a new image file, then create a function for drawing. The coordinate system is the normal computer one with the upper left hand corner being 0,0 (x,y coordinates) x increases across the screen y increases down the screen. Note that all coordinates are given to the drawing methods as a list (square brackets) [x0,y0,x1,y1 ...] or a list of tuples (round brackets) [(x0,y0),(x1,y1) ...].
Show/Hide Code
 1from PIL import Image, ImageDraw
 2
 3w = 24  # used to set width
 4h = 24  # used to set height
 5transparent = (255,255,255,0)
 6# used to set background colour - using an RGBA format
 7
 8img = Image.new('RGBA', (w,h), transparent)
 9# create a new image organized with RGBA pixels,
10# of a given size with the set background colour,
11# in this instance transparent
12idraw = ImageDraw.Draw(img)
13# create function for drawing within the new image img.
14
15idraw.line([0,0,w-1,0],fill='black',width=1)
16# draw line on upper part of the image
17idraw.line([0,0,0,h-1],fill='black',width=1)
18# draw line on left part of the image
19idraw.line([w-1,0,w-1,h-1],fill='black',width=1)
20# draw line on left part of the image
21idraw.line([0,h-1,w-1,h-1],fill='black',width=1)
22# draw line on lower part of the image
23
24idraw.ellipse([0,0,w-1,h-1],outline='red')
25
26img.save('line_test.png') # save to file
Start by making a square formed from four black lines one pixel wide. Note that we needed to use the coordinates width-1 and height-1 (w-1, h-1), this ensures that the lines fit just inside our image and are 24 pixels long, (since the starting point is zero and our image size is 24x24). We could have drawn the lines as a single line in sequence.
idraw.line([0,0,w-1,0,w-1,h-1,0,h-1,0,0])
# alternative method to draw lines, calling line only once
Note
With this method start and finish at the same point (in this case 0,0), the default colour is white. Test by replacing the highlighted lines 15-22.
If we had used a polygon then there normally is no need to close off. The outside of the polygon is called outline, fill can be used as an internal filling method.:
idraw.polygon([0,0,w-1,0,w-1,h-1,0,h-1],outline='#FFFFFF',fill='red')
# alternative method to using line
# the colours specified here are a hash and a named colour
In order to draw curved lines we need to know the bounding box that defines the size and position of the curve. We can use the square we drew before and utilise its upper left and lower right points to define the bounding box for a circle - a special case of the ellipse. Ellipses also use the same methods to colour as used by polygons.

Small Circles#
Circles progressing in size from 1 to 9 pixel radius
Continuing on with our drawing, insert a circle in our square.
idraw.ellipse([0,0,w-1,h-1],outline='red')
# not quite right - too small
Redraw with a slightly larger circle.:
idraw.ellipse([0,0,w,h],outline='red')
# also not right - too big
Maybe a case of the Goldilocks size, if h and w had been 23 then the first attempt would have been correct. If we draw a circle it has a radius that must be an integer, so the bounding box must be an even number of pixels wide and high. The outside black square we drew corresponds to the bounding box, see that the circle overlaps the the bounding box on all four sides, and our case should touch all four sides of the image, in the real world lines have breadth which is why the bounding box is not a simple dimension, this is not quite the same as tkinter canvas shown in 8.11 Canvas Oval Objects in the "Tkinter 8.5 reference a GUI for Python".
Change the ellipse (circle) into 4 arcs:
idraw.arc([0,0,w-1,h-1],start=0,end=90,fill='red')
# angles are measured from 3 o’clock, increasing clockwise
idraw.arc([0,0,w-1,h-1],start=90,end=180,fill='green')
# the colour parameter is fill
idraw.arc([0,0,w-1,h-1],start=180,end=270,fill='yellow')
idraw.arc([0,0,w-1,h-1],start=270,end=360,fill='blue')
Note
See how the arc is positioned and how start and end are specified, the same system is used for pieslice.
If we wish to produce rounded corners in a large enough size so that curves can be drawn then we will need to enlarge everything, image size, lines and their widths. Ordinary lines can be directly drawn with their width without too much trouble. Arcs pose a problem since they have no width or fill method.
Pieslice is the solution, we first draw a larger pieslice that picks up on the required outside radius, then we draw a smaller pieslice that picks up on the inner radius. The larger pieslice has a colour corresponding to the corner whilst the smaller pieslice has a background colour. Both pieslices use the same centre.
In the first configuration the two borders run along the outside edges then are joined by pieslices with radii corresponding to the width of the border. Let's start a new file.
Show/Hide Code
 1from PIL import Image, ImageDraw
 2
 3e = 9  # enlargement
 4d = (e-1)//2 # displacement
 5w = 23 # normal image width
 6h = 23 # normal image height
 7we = w*e # enlarged image width
 8he = h*e # enlarged image height
 9g = 1 # gap
10s = g*e # space (enlarged gap)
11
12img = Image.new('RGB', (we,he), 'white')
13# nothing fancy using an enlarged size
14idraw = ImageDraw.Draw(img)
15
16idraw.line([s,0,we-1,0],fill='black',width=e)
17# draw line on upper part of the image, gap at the upper left
18idraw.line([0,s,0,he-1],fill='black',width=e)
19# draw line on left part of the image, gap at the upper left
20
21img.save('corner_test'+str(g)+'.png')
22# save to file - seeing what we have drawn in the enlarged size
Not quite right, the lines are thick but the full width does not show (magnify until you can see the pixels), therefore we need to adjust both lines. The line width was given as 9 pixels (enlargement factor) but only 5 are showing.

Top left corner of corner_test1.png#
Wider lines appear to be referenced from a location close to their centre rather than an outside edge. Lines with odd sized widths use the central measurement less 1, whereas lines with even sized widths use the same size as the previous odd value. This means that lines of 1, 2 or 3 pixels width need no adjustment whereas wider lines will need either a vertical or horizontal displacement.
After adding the line displacement (d) to the line, add a pieslice, with a different colour, allowing us to trace errors a little easier ...
Show/Hide Code
idraw.line([s,d,we-1,d],fill='black',width=e)
# adjusted for linewidth using d
idraw.line([d,s,d,he-1],fill='black',width=e)
# adjusted for linewidth

idraw.pieslice([0,0,s*2-1,s*e-1],fill='orange',outline='orange',
   start=180,end=270)
# the bounding box starts at 0,0 then finishes at s*2-1,s*e-1
# if alright, change to black then resize
if g> 1:
   idraw.pieslice([s//2,s//2,s*2-s//2-1,s*2-s//2-1],
   fill='yellow',outline='yellow', start=180,end=270)


imgx=img.resize((w,h))
# changed the image to our reduced size
imgx.save('corner_testx'+str(g)+'.png', quality=95)
# save to file final size with no resampling filter
# the corner pixels are all black - should be improved with a filter

imgb=img.resize((w,h),Image.BICUBIC)
imgb.save('corner_testb'+str(g)+'.png', quality=95)
# save to file using bicubic filter

imgL=img.resize((w,h),Image.LANCZOS)
imgL.save('corner_testL'+str(g)+'.png', quality=95)
# save to file using lanczos filter
The image was saved after being resized with a filter. A reference to the gap size is given in the image name. Small differences in the antialiasing pixel colours can also be tested by changing the filter from bicubic to lanczos. Only one pieslice is needed at a gap size of one, otherwise an extra pieslice is required.
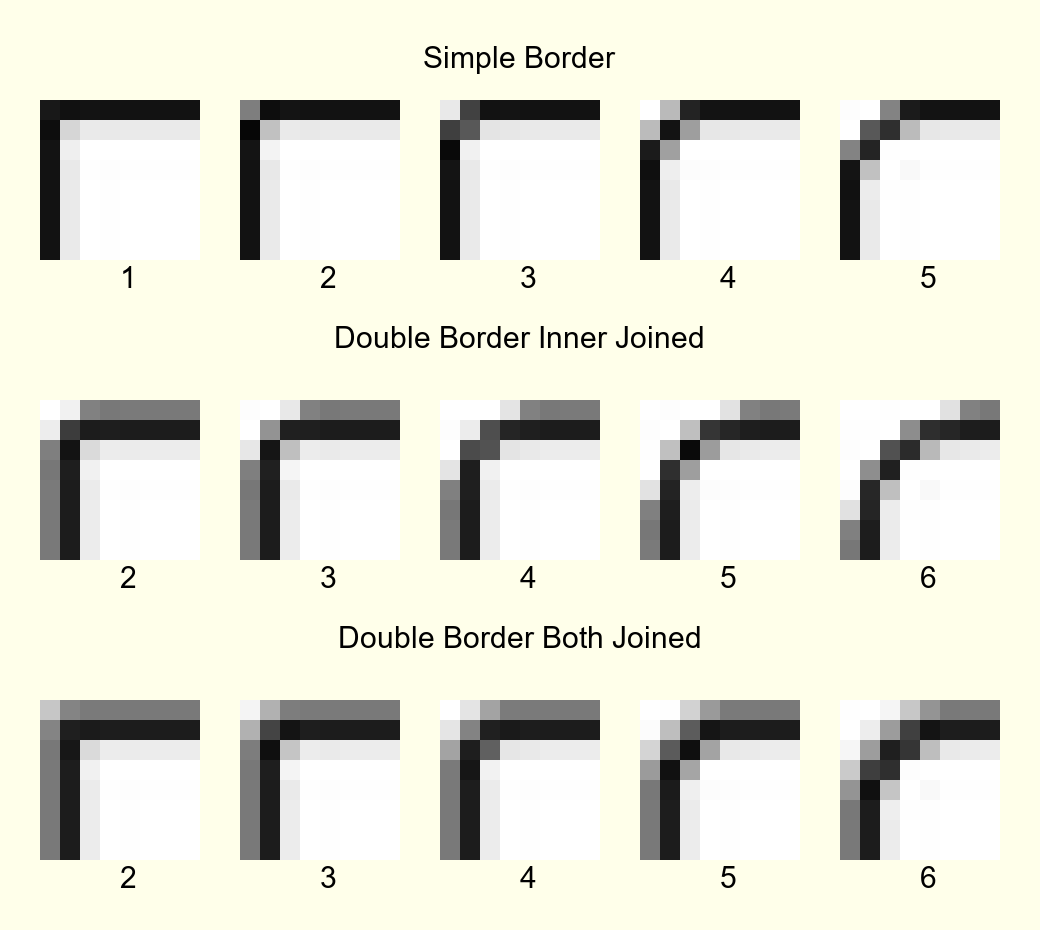
Corners Created with Changing Gap Sizes#
The gap is filled by pieslice(s) to create our arcs. The upper row of the corner image shows a simple border with various gaps starting from 1 and increasing to 5. The next row uses an outer border where only the inner border is joined, whilst the last row shows the effect of joining both inner and outer borders. In the lower two rows the gaps progress from 2 to 6.
When we enlarge the gap use two pieslices, the larger filled with the corner colour, the second filled with the background colour. The difference in pieslice radii gives the corner thickness. As the gap increases further the pieslice (arc) changes its bounding box not only with increasing pieslice radius but where it is centred.
It is often much easier to draw the pieslice, or any of the other regular curved lines, using a simple helping function, such as create_pieslice. Here pieslice is created using the centre (c) and radius (r).:
def create_pieslice(idraw,c,r,outline='#888888',fill='#888888',start=0,end=90):
   return idraw.pieslice([c[0]-r,c[1]-r,c[0]+r-1,c[1]+r-1],
      outline=outline,fill=fill,start=start,end=end)
As we change the gap size we can see the effects of the resampling filter and compare whether a bicubic or lanczos works better. Also check what happens if we use an enlargement factor of 8, in particular on the original size and whether the pieslice marries up with the border lines and whether this noticeably affects the final image after filtering.
With increased gap size the final corner layout changes. On the simple border the gap is simply a filled join then at a gap of 3 the filling has a stepped inward part, at a gap of 4 the filling becomes a straight diagonal, while at a gap of 5 the filling becomes an outward stepped diagonal. Using a gap of 1, there is no real chance for the filter to get to grips, all it can do is produce very dark greys along the borders, with a lighter grey at the junction of the 2 lines at 1,1 but this is unlikely to fool most people into believing that we have a rounded corner, (see Simple Border with a gap of 1).
As an exercise it is instructive to use the reduced image without any filter, then resize this image back to the enlarged size. This should create an angular image which we can now once again reduce in size but with a lanczos filter, the result should be similar to the image created when we used pieslices, but the antialias pixels will be washed out and the result would not fool many.
Alter the script to include an outer border and an inner border. Then tie both borders together with pieslices, the resulting changes with different sized gaps help us to find out how the original widget was constructed.
|
|
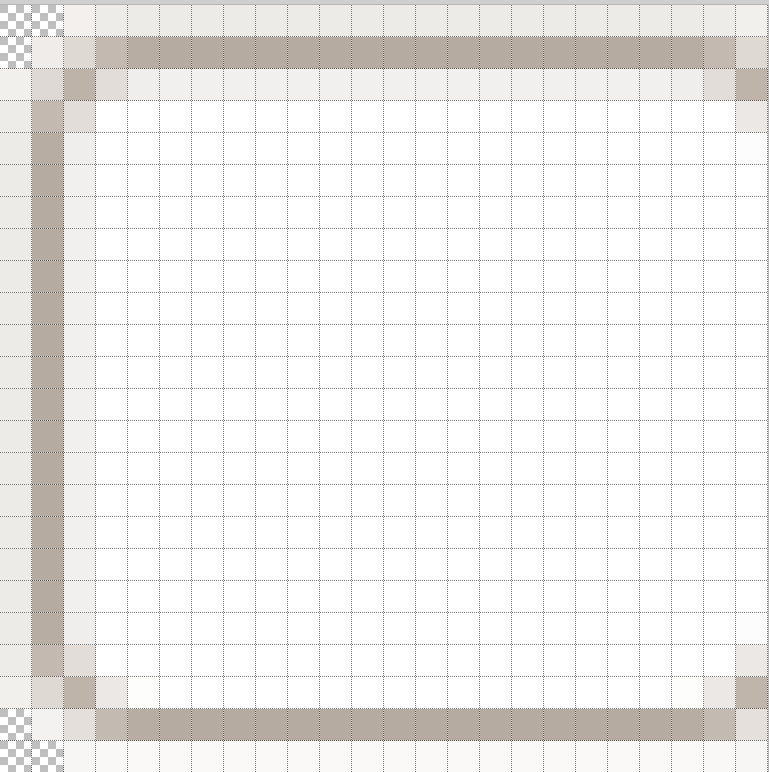
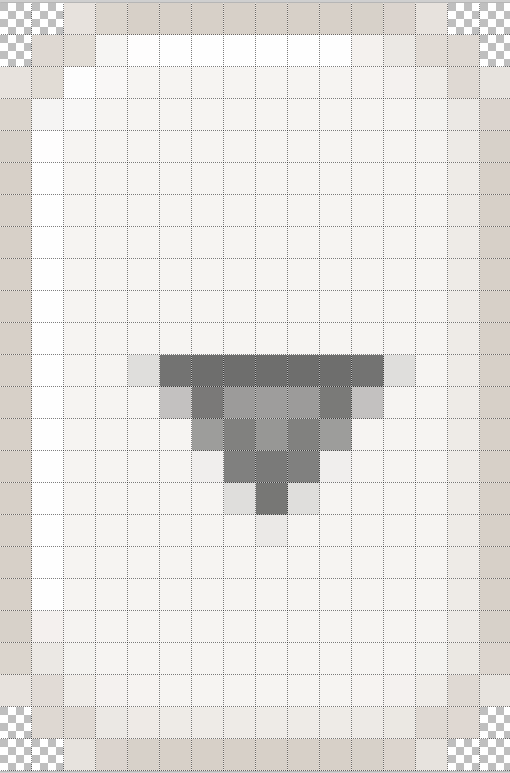
Look at the differences between combo-n.png and comboarrow-n.png, apart from image size note that the plain combo has an outer lighter border and that the corner diagonal has no step, whereas the comboarrow image has a plain border and a stepped diagonal facing outwards. From this information we can now deduce the gap size, hence the required pieslice radii.
We can create rectangles directly using rectangle, this uses a bounding box, similar to pieslice, and just like pieslice we can create thick rectangles using two or more nested rectangles. However what is important is that we can simplify our scripting and the following uses principles derived from http://nadiana.com/pil-tutorial-basic-advanced-drawing.
Simple Rectangle in PIL#
Rounded Rectangles#
Simple Border#

Blue Rectangle with Rounded Corners#

Blue Rectangle with Rounded Corners Resized#
The next part is to create the corners, for this we use pieslice, make a corner image that is pasted in turn onto all four corners. Where the corners are pasted parts of the rectangles are overdrawn, so complete rectangles can be used. Use the assist function so that pieslice is dependant on its centre and radius, rather than a bounding box.

Blue Rectangle with Rounded Corners Resized and enlarged#
Show/Hide Code 08rounded_rectangle.py
# Rounded Rectangle
from PIL import Image, ImageDraw

e = 9 # enlargement, also thickness between rectangles
w = 23
h = 23
we = h*e  # based on circle sizes
he = w*e
j = 5 # gap size
s = j*e # space

# create pieslice with centre and radius, assume only fill used
def create_pie(idraw,c,r,fill='#888888',start=180,end=270):
    return idraw.pieslice([c[0]-r,c[1]-r,c[0]+r-1,c[1]+r-1],
                          fill=fill,start=start,end=end)

def round_corner(radius, outline, fill):
    """Draw a round corner"""
    corner = Image.new('RGBA', (s, s), (0, 0, 0, 0))
    idraw = ImageDraw.Draw(corner)
    create_pie(idraw,[s,s],s,fill=outline)
    create_pie(idraw,[s,s],s-e,fill=fill)
    return corner

def round_rectangle(size, radius, outline, fill):
    """Draw a rounded rectangle"""
    width, height = size
    box = 0,0,width-1,height-1
    rect = Image.new('RGBA', size, fill)
    draw = ImageDraw.Draw(rect)
    corner = round_corner(radius, outline, fill)
    draw.rectangle(box, fill=outline)
    # The outer rectangle
    draw.rectangle( # The inner rectangle
        (box[0] + e, box[1] + e, box[2] - e, box[3] - e),
        fill=fill)
    rect.paste(corner, (0, 0))
    rect.paste(corner.rotate(90), (0, height - radius))
    # Rotate the corner and paste it
    rect.paste(corner.rotate(180), (width - radius, height - radius))
    rect.paste(corner.rotate(270), (width - radius, 0))
    return rect

img = round_rectangle((we, he), s, "blue", "white")
#img.show()
img.save('../figures/08rounded_rect'+str(j)+'.png')

limg = img.resize((w,h),Image.LANCZOS)
#limg.show()
limg.save('../figures/08rounded_rect_L'+str(j)+'.png')
We have three functions, the first function is our helping function for the pieslice. The next two functions are more interesting. In round_corner we have a function that independantly draws a corner consisting of two pieslices and creates a small image with its own ImageDraw method with alias. The third function also has its own image and drawing methods, creates two rectangles whose sizes and colours will be matched by the pieslices. The corner is called 4 times and is pasted and rotated as required, (the corner image is treated as a rectangle that is positioned by its upper left corner inside the rectangle image).
Double Border inner Joined#
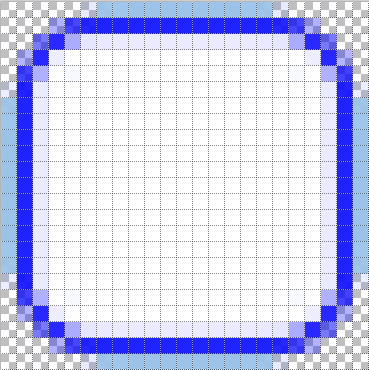
Two Blue Rectangles with Rounded Corners resized and enlarged#
08rounded_rectangle_inner.py similar to 08rounded_rectangle.py, except that we draw three rectangles and two pieslices, which in turn match up with the inner rectangle. The corner mask is enlarged slightly so that the dark blue rectangle matches the simple border.
Show/Hide Code 08rounded_rectangle_inner.py
# Rounded Rectangle only inner joined
from PIL import Image, ImageDraw

# http://nadiana.com/pil-tutorial-basic-advanced-drawing

e = 9 # enlargement, also thickness between rectangles
w=23
h=23
we = w*e  # based on circle sizes
he = h*e
j = 5 # gap size
s=j*e # space

# create pieslice with centre and radius, assume only fill used
def create_pie(idraw,c,r,fill='#888888',start=180,end=270):
    return idraw.pieslice([c[0]-r,c[1]-r,c[0]+r-1,c[1]+r-1],
                          fill=fill,start=start,end=end)

def round_corner(radius, inner, outline):
    """Draw a round corner"""
    corner = Image.new('RGBA', (s+e, s+e), (0, 0, 0, 0))
    idraw = ImageDraw.Draw(corner)
    create_pie(idraw,[s+e,s+e],s,fill=outline)
    create_pie(idraw,[s+e,s+e],s-e,fill=inner)
    return corner

def round_rectangle(size, radius, fill, outline,inner):
    """Draw a rounded rectangle"""
    width, height = size
    box = 0,0,width-1,height-1
    rect = Image.new('RGBA', size, fill)
    draw = ImageDraw.Draw(rect)
    corner = round_corner(radius, inner, outline)
    draw.rectangle(box, fill=fill)
    # The outer rectangle
    draw.rectangle( # The inner rectangle
        (box[0] + e, box[1] + e, box[2] - e, box[3] - e),
        fill=outline)
    draw.rectangle( # The innermost rectangle
        (box[0] + 2*e, box[1] + 2*e, box[2] - 2*e, box[3] - 2*e),
        fill=inner)
    rect.paste(corner, (0, 0))
    rect.paste(corner.rotate(90), (0, height - radius-e))
    # Rotate the corner and paste it
    rect.paste(corner.rotate(180), (width - radius-e, height - radius-e))
    rect.paste(corner.rotate(270), (width - radius-e, 0))
    return rect

img = round_rectangle((we, he), s, "lightblue", "blue", 'white')
#img.show()
img.save('rounded_rect_inner'+str(j)+'.png')

limg = img.resize((w,h),Image.LANCZOS)
#limg.show()
limg.save('../figures/08rounded_rect_inner_L'+str(j)+'.png')
Double Border both Joined#
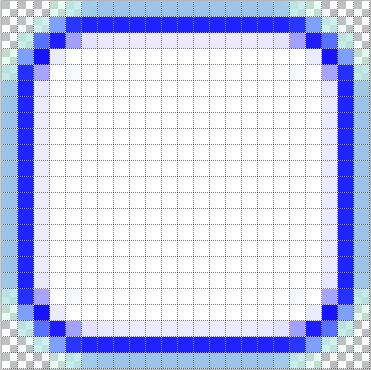
Two Blue Rectangles with Rounded Corners resized and enlarged#
08rounded_rectangle_both.py similar to 08rounded_rectangle.py, except that we draw three rectangles and three pieslices, which in turn match up to the rectangles. The corner mask is enlarged slightly so that the dark blue rectangle matches the simple border.
Show/Hide Code 08rounded_rectangle_both.py
# Rounded Rectangle both inner and outer joined
from PIL import Image, ImageDraw

# http://nadiana.com/pil-tutorial-basic-advanced-drawing

e = 9 # enlargement, also thickness between rectangles
w = 23
h = 23
we = w*e  # based on circle sizes
he = h*e
j = 5 # gap size
s = j*e # space

# create pieslice with centre and radius, assume only fill used
def create_pie(idraw,c,r,fill='#888888',start=180,end=270):
    return idraw.pieslice([c[0]-r,c[1]-r,c[0]+r-1,c[1]+r-1],
                          fill=fill,start=start,end=end)

def round_corner(radius, outline, inner, fill):
    """Draw a round corner"""
    corner = Image.new('RGBA', (s+e, s+e), (0, 0, 0, 0))
    idraw = ImageDraw.Draw(corner)
    create_pie(idraw,[s+e,s+e],s+e,fill=outline)
    create_pie(idraw,[s+e,s+e],s,fill=inner)
    create_pie(idraw,[s+e,s+e],s-e,fill=fill)
    return corner

def round_rectangle(size, radius, outline, inner, fill):
    """Draw a rounded rectangle"""
    width, height = size
    box = 0,0,width-1,height-1
    rect = Image.new('RGBA', size, fill)
    draw = ImageDraw.Draw(rect)
    corner = round_corner(radius, outline, inner, fill)
    draw.rectangle(box, fill=outline)
    # The outer rectangle
    draw.rectangle( # The inner rectangle
        (box[0] + e, box[1] + e, box[2] - e, box[3] - e),
        fill=inner)
    draw.rectangle( # The innermost rectangle
        (box[0] + 2*e, box[1] + 2*e, box[2] - 2*e, box[3] - 2*e),
        fill=fill)
    rect.paste(corner, (0, 0))
    rect.paste(corner.rotate(90), (0, height - radius-e))
    # Rotate the corner and paste it
    rect.paste(corner.rotate(180), (width - radius-e, height - radius-e))
    rect.paste(corner.rotate(270), (width - radius-e, 0))
    return rect

img = round_rectangle((we, he), s, "lightblue", "blue", 'white')
#img.show()
img.save('../figures/08rounded_rect_both'+str(j)+'.png')

limg = img.resize((w,h),Image.LANCZOS)
#limg.show()
limg.save('../figures/08rounded_rect_both_L'+str(j)+'.png')
08rounded_rectangle.py, 08rounded_rectangle_inner.py and 08rounded_rectangle_both.py are the three scripts on which we can base many of our widget scripts, the first script has the corner joining the single border, the second script has two borders with only the inner border is joined whereas the third script joins both borders.